Conquer the Trail - Repairing your Bike: It’s not only a Man’s World

“Eh, no need to bring tools for just a little bike ride!” This is exactly a school of thought that can lead to disaster. Different, yet equally unnerving would be, “I have everything that I need to get through any situation, but I’ve never replaced a broken chain by myself!” Most of the time, this is what happens and we are stuck with a flat tire without a clue what to do about it. So, either by some chance your knight in shining armor comes to the rescue, or you end up pushing your bike all the way home. Punctures, broken chains, derailleur adjustments, used brake pads, these types of issues can present themselves on any bike tour. Here are a few tips to make sure that you don’t find yourself stranded with a bike that no longer works.
Everyday Mountain Bike Tool Kit
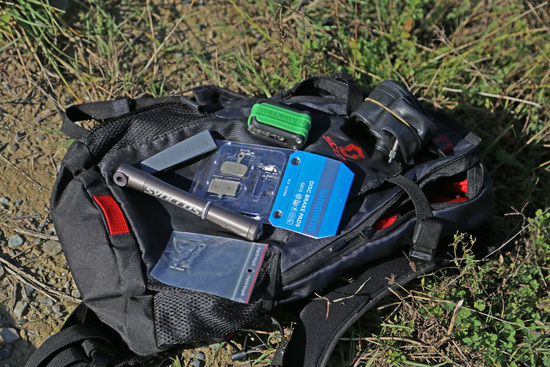
1. Multi-tool with all of the necessary bits
2. Extra chain links and pins. A chain fastening tool is equally important.
3. Extra inner tube. This doesn't weigh much, but goes a long way in terms of time and effort.
4. Tire levers
5. Mini-pump
6. Extra brake pads
Tip:
When repairing, make sure to never put your bike on the ground upside down. Just place it on the floor on its side on the opposite side of that which needs repairing, or ask a friend to hold the bike up for you.
Fixing a Flat Tire
Flat tires while mountain biking are a common occurrence. With the right tools and the right technique, though, you’ll be back up and riding in no time.
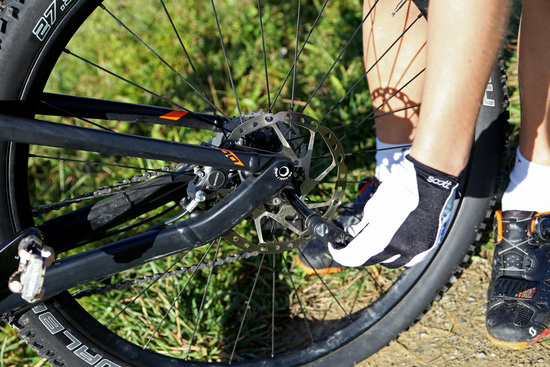
1. Take off the wheel
Unscrew the quick release, and take off the wheel. Note: For the rear wheel, don’t forget to put the chain on the smallest gear, as this will make it easier to remount the wheel. Pull the derailleur towards the rear, and the chain will come off the cassette allowing you to remove the wheel. This is a dirty business, so if you want to avoid greasy fingers, wear gloves.
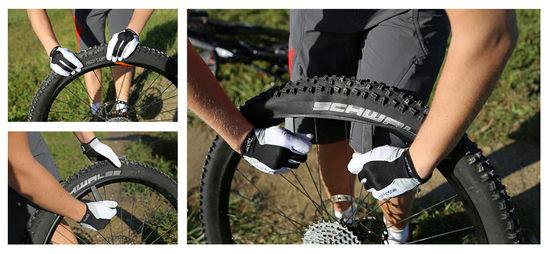
2. Remove the tire from the rim
Press both sides of the tire together towards the middle of the rim, then push one of the sides over said rim. If you need help to do this, tire levers are very helpful. Put the tire lever in between the rim and the tire, and create an opening. From there, put in the second tire lever, and proceed to slide it around the entire wheel, removing one side of the tire from the rim. Now, push the tube valve through the rim, and take out the punctured tube.
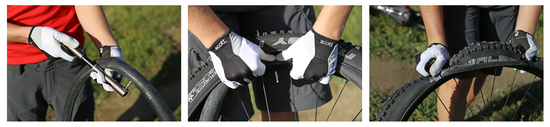
3. Insert the new tube
Lightly pump some air into the tube, just enough to create the proper tube shape. Put the tube valve through the rim, and proceed to place the tube without any creases or folds. When doing this, make sure that there are no rocks in between the rim and the tube. Even though it is rare, even tubeless setups can puncture. In this case, a C02 capsule is greatly welcomed. However, it is imperative that you keep the tubeless valve at the top after having unscrewed it.
4. Place the remainder of the tire onto the rim
With both hands, place the tire onto the rim. Start at the bottom, then work the tire onto the rim and into the center channel of the rim until you get to the last quarter. This part can be difficult, so hold the wheel down with your foot and pull the tire over the sidewall of the rim with your fingers bit by bit until the tire is completely mounted on the rim. Sometimes the tire will not want to go in, in which case you can once again use your tire levers. When doing this, take special care to make sure that you don’t pinch the tube. Before pumping the tube full of air, make sure that the tire has been evenly placed, and check once more that the tube is not pinched. Pump up your tube, and carefully take the pump off of the valve so as to not damage it in any way.
Repairing a broken chain
When in a situation in which your chain has broken, the only solution is to have a multi tool that is equipped with a chain tool or splitter. It is useful to have extra links and pins in order to not have a shorter chain post repair. Once you have done this repair once, you’ll find that it does not require wizardry.
1. Insert a new pin
Take both broken ends of the chain, and with the new pin, put them together. Make sure to have replacement pins and links that are the same brand as your chain.
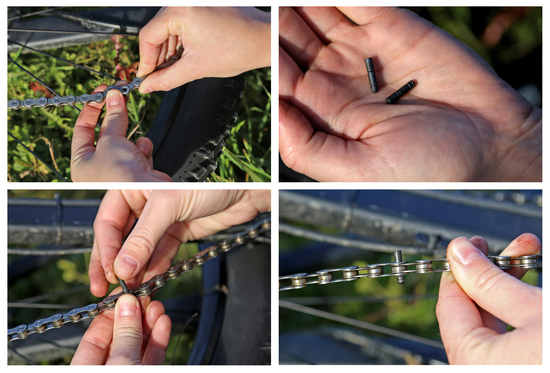
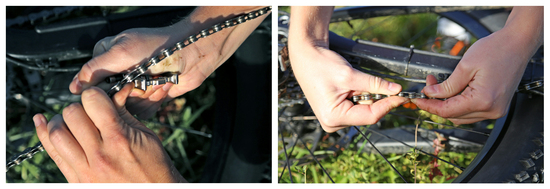
2. Use the chain tool
Place the chain on the chain tool where the new pin needs to be placed. Twist the knob of the chain tool to push in the new pin. It is normal that as you are twisting, there will be some resistance- this is fine. Once the pin is correctly placed in the new link, you are ready for the next step.

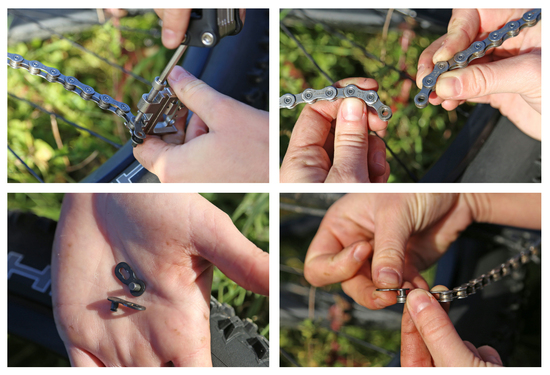
3. Break off the pin
Now, half of the new link is out of the chain (Shimano system). Break off this piece with the aid of the chain tool or some pliers. Then run the chain front and back to get some grease on the new link so that the chain doesn’t jump.
Alternately, you can also use a “powerlink” (from Sram) that you have to insert where the chain is broken.
1. Take off a link, in order to have a female link at both ends.2. Place the powerlink.
4. Block the rear wheel with the brakes and press on the pedal to correctly set the powerlink into place.
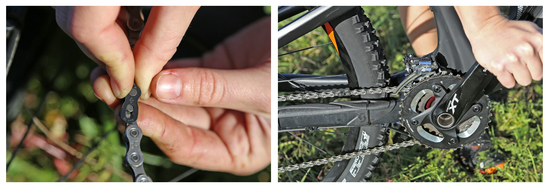
Make sure to replace your chain after this - it’s time for a new one!
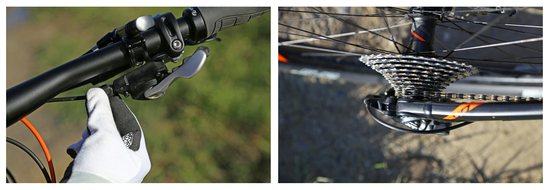
Adjusting your Derailleur
If you chain is grinding or your gears are not changing smoothly, it is very annoying. However, there is a quick fix to this problem, assuming the derailleur was mounted properly in the first place. Sometimes it is sufficient to just alter the tension in the derailleur cable, which can be done easily without any tools or even getting off your bike. First, determine if the issue stems from the front or the rear derailleur.
Adjusting the front derailleur
Found on your left shifter where the cable connects there is a barrel adjuster. If you unscrew it, the tension in the cable rises. Inversely, if you tighten it, the tension decreases. While looking at your derailleur cage, you can see if the chain is rubbing against the interior or exterior relative to your bike. If it is rubbing on the exterior, you have to augment the tension. If it is rubbing on the interior, that is on the frame side, you have to loosen the tension.
Adjusting the rear derailleur.
If the chain is making strange noises on the rear derailleur, there are two ways to go about dealing with this. Option one is to tighten or loosen the tension on the chain via the screwing mechanism on the shifter (like with the front derailleur.) If the chain is not shifting well into a higher gear, then you have to increase the tension. If the chain is not shifting well into a lower gear, then you have to decrease the tension. If altering the tension in this way does not work, then we look to option two. In the back of the rear derailleur you will find a screw that also serves to adjust the tension of the cable, but in an amplified fashion. Most of the time, tightening or loosening one quarter or a full turn, perhaps even half of a full turn, is enough. If this doesn’t work, it is likely that the original set up the derailleur, if it was a new bike or a new component, was not done correctly. In this case, it is wise to ask a specialist.
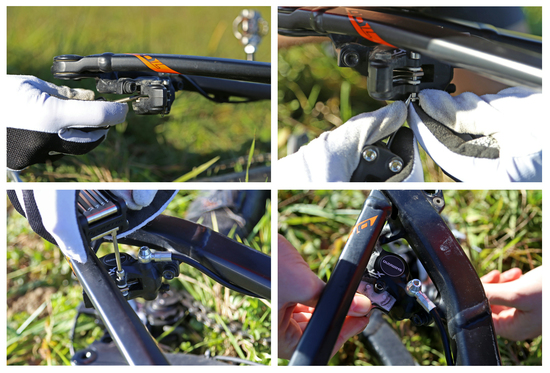
Changing Brake Pads
Remove the wheel and then, with the old brake pads still in the brake caliper, carefully push the brake pistons back as far as they go with a flat tool, such as a screw driver. Do not do this with the new pads in place as you can damage the surface of the pads. With the help of an allen key, unscrew the brake mechanism and take out the faulty brake pads. Certain brakes will have a security mechanism instead of a screw, which will you have to take out with the pads. Put in the new pads, then put the security mechanism back in place and reinstall the wheel. Make sure that the new pads do not come in contact with oil or grease.
Have a nice ride!

Karen Eller
Episode 1: How to choose the right bike
Episode 2: Right Preparation for the season
Episode 3: How do I set up my bike correctly?
Episode 4: What equipment do I really need?
Episode 5: Skills come with practice
Episode 6: Riding Techniques for Advanced Riders
Episode 7: How do I lose my Fear?
Episode 8: The Right Nutrition - Fit for the Trails!