Conquer the Trail - How Do I Set Up My Bike Correctly?

Regardless of whether you already have your own bike or if you've just bought a new one, there are many ways to improve its performance and riding features. Read further to find the best tips for adjusting your bike properly.
When new to the sport, you very quickly find yourself in front of a wall of specific terms, bike slang and technical details. It may not be easy to remember everything at first. However, there are some essentials to know. Additionally, it is a huge benefit if you are able to adjust your bike’s basic settings by yourself.
A saddle at the wrong height wastes a lot of energy, a stem that’s too long puts the load on the front of the body in sitting position and makes the bike more difficult to control. A handlebar that’s too low will make the bike unnecessarily nervous. Unlike a car, bike components such as the fork and shock should be set according to the rider. While a mountain bike can seem so simple at first glance, it becomes a really complex sports engine when it comes to settings. Each one of you should take the opportunity to have a perfectly adjusted bike from the beginning and be present while these settings are being done. Don’t forget that bikes need to be checked from time to time, even old ones!
Cockpit
The handlebar and the stem are the bike’s control center (cockpit), just like the steering wheel and the column are a cars control center. Begin moving the gear and brake levers inwards so that you can use the brake lever ideally with just one finger or a maximum of two. Once these are properly placed, turn the bar on its axis to find a comfortable position in which your wrists are as straight as possible.

The handlebar should more or less correspond to the width of your shoulders. Bikers with narrow shoulders can possibly shorten their handlebar, while those with wider shoulders should choose one accordingly.
Sitting Position
Professional bikers immediately notice every millimeter that their saddle was moved higher or lower, because they have their specific sitting position almost printed in their DNA. This demonstrates the importance of an optimal combination of height, position and gradient of the saddle. First of all, your seat post should have a quick release. As a result, you can easily lower your saddle before a descent. In addition to this technical detail and before going any further, you will have to adjust your saddle to the correct height. To do this, sit on your bike with your heel (in cycling shoes!) on the pedal placed at its lowest point, but aligned with the seat post (so slightly inclined). Your leg should not be completely tensed. You can mark your optimal saddle height with a line of permanent marker in order to quickly find your correct height after a descent.
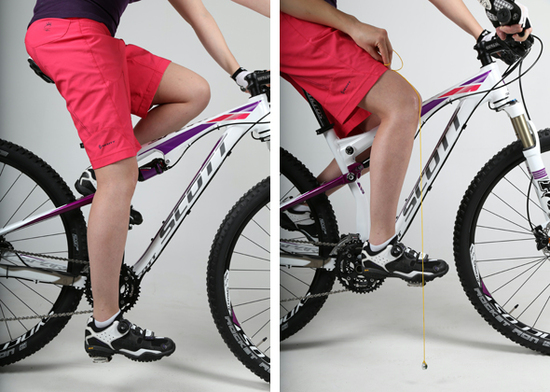
The next step is to adjust the horizontal position of the saddle on the seat post. To do this, a second person is needed. Attach a weight to a string and make it hang from your tibial plateau (the bone just below the kneecap) while sitting on your bike. As a general rule, it is assumed that when the foot pedal is clicked in the horizontal position, the string should fall just behind or in line with the axis of the pedal. If the string does not fall correctly, then you have to move your saddle accordingly until the right position is found! A saddle that sits too far forward causes pain in the knees while a saddle that sits too far back overloads the calf muscles.
The gradient of the saddle is the final touch and plays an important role in the comfort of the bike. This setting allows shoving of pressure points while sitting. You can check the angle of your seat with a bubble level. If your saddle points too far down, you will slide forward and there will be too much pressure exerted on the bottom of your palms. On the other hand, if your saddle points too far up, it can cause uncomfortable pressure in the crotch. Some bikers ride with a slightly downwardly inclined seat, but normally it is better to have it perfectly horizontal for best allocation of your body weight. Although in the end it is up to the individual to decide!
Fork Settings
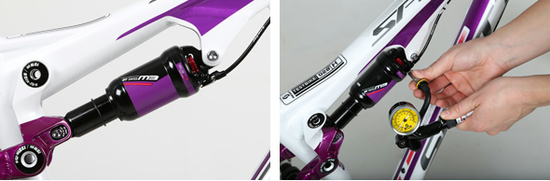
Currently, the most used forks on the bike scene are produced by FOX and Rock Shox. Air and oil suspensions have replaced metal springs, which means that you can adjust the stiffness of the fork by adjusting the air pressure with a small pump and you can set the damping (compression and rebound) by rotating a knob.
On FOX forks, attach your shock pump to the valve placed on the left of the crown. Normally, you should pump the equivalent of your own weight in PSI (you will find this unit on all pumps). Sometimes, a little less is enough for a very comfortable setting. Rebound can be adjusted using the red knob under the right tube. When rotating it inwards, the rebound gets slower. From a fully open position, turn the knob 1 to 3 times. This should suit most trails.

On Rock Shox forks, you will find a weight/air pressure chart printed on the tube - a small detail that facilitates settings. These forks have a negative chamber in the lower part of the tube and a positive chamber in the upper part which must be adjusted accordingly. The chart defines a scale of settings for each of them but in general, we just choose the smaller value. Just as for FOX, the rebound knob is underneath the right tube. Once these settings are done, there is not much left to adjust. From this point we use a Lockout system to completely block the fork when pedaling uphill on asphalt.
Shock Settings
Most air shock models are produced by FOX and are set in the same way as forks. You adjust stiffness with a shock pump and rebound with a knob (usually red, as on the forks). However, we barely find any recommendations about air pressure on the bikes. So you just have to try and get the right feel. From here on, you have to add an important new technical word to your bike vocabulary: sag. According to your rear triangle system, you will need a sag of between 20 and 30 percent of the piston length. To check this, shove the rubber O-ring to the very end of the shock shaft. Then, sit on your saddle and see how far the shock travels supporting only your body weight. The distance from the shock shaft to the edge of the rubber O-ring is the sag. However, for an accurate setting, it is better to get advice from your local dealer or from an expert. Do not forget that only an optimally adjusted fully will make for the most fun!
Same as with the fork, the rebound is set according to individual preferences. From a fully open position, 2-3 knob turns are usually enough. Caution: you must proceed in a systematic way! This means, you have to screw the knobs one after the other and not all at the same time. Eventually, you can do the following check: sit on your bike and ride down a sidewalk, still sitting on your saddle. Your shock should normally bounce one and a half times. If this is the case, then the setting is correct.
Some models have a shock Lockout or Platform system, which you can activate with a small lever. When flapping it down, the rear triangle either becomes completely stiff (Lockout) or resistant without being completely blocked (Platform). This setting is intended to facilitate uphill pedaling and avoid annoying seesaws. Currently, some manufacturers (eg. Rock Shox or SCOTT) enable you to block the shock with a small lever placed on the handlebar. The big advantage of this system is that you no longer need to remove your hand from the bars while riding.
To use these functions correctly and optimally, you should definitely spend some time trying different settings, learn to read the terrain in which you ride and develop a certain feeling to determine which setting you need. Practice makes perfect!
Tip:
If you go on a bike tour with a big backpack, it is better to set your fork and shock accordingly (i.e. stiffer) or determine the sag once you’re all geared up.
Tire Pressure and Choice
There is no bike part that is less considered than tires. Yet, tires have the greatest influence on riding behavior, rolling resistance and safety. You can read the width of a tire– always measured in inches – on the tire’s edge. The narrower the tire, the less comfortable and more likely they are to puncture. Lightweight women obviously do not need 2.4 inch monsters, but there is nothing to say against a fair 2.25 inch pair. Note: tires under 2 inches should no longer be considered as mountain bike tires. With regards to the tire pressure, you should not go beyond 2 bars. Only bikers over 80 kilos need that much pressure, or even more. Men usually inflate their tires with more air pressure than required as this setting depends on their own body weight. The lighter you are, the lower your tire pressure should be. The minimum pressure recommended by the manufacturer is always written on the edge of the tire. Concerning tire choice, you should not only take into account a low rolling resistance but you should also pay attention to the transfer of braking forces on the ground. Your local store will give you best advice if you tell them where you intend to ride.

For or Against Weight Tuning?
You probably think that tuning is a guy’s thing, a world apart for real bike freaks. Well, let me tell you that for women, weight tuning makes the most sense. Light rider, light bike. The load that a lightweight rider transfers on her bike and its components is much lower than that exerted by a hefty man. What does this mean in practice? You can push many of your bike components to their weight limits: light tubes, rims with less spokes, fine carcass tires, an ultra-light cockpit and carbon parts everywhere.
Tip: Fear Not Carbon
Lately, carbon fiber has been popping up everywhere. More and more often being used as a building material for frames, you can also find it for handlebars, stems and seat posts. Carbon is light and stiff at the same time, and it has proven its stability in many large-scale tests - provided that the parts have been properly manufactured. In practice, carbon shows a small disadvantage during transport. One shouldn’t transport a carbon bike on a classic bike-rack as the bike tubes do not really appreciate being tightened. Therefore, we recommend to transport your bike in the car rather than on the roof.
Now you just have to enjoy your new perfectly set bike!

Karen Eller
Episode 1: How to choose the right bike
Episode 2: Right Preparation for the season